

This web-to-lead form trick is for all you Salesforce professionals who, like me, have run into this recurring situation: Web-to-lead forms that are configured to capture a person’s name and demographics, but lack the ability to provide greater contextual information on the lead.
Let’s back up for a second to this important overview on web-to-lead (W2L) forms: They are frequently a part of SMB Salesforce QuickStarts. In fact, a simple W2L form can be the cornerstone in a business’ online strategy and also an entry point for the “Top of the Sales Funnel” in many sales processes.
One of the powers of Salesforce is its ability to not only track the demographics, but the history of a lead as it goes through its life cycle. And part of that history is knowing which leads come from a W2L form.
There are two ways to get that background lead information you’re looking for. The first is to use the “Lead Source” field in the W2L form to tag where the form came from. This can either be a hidden field that stamps “website” on the form or a field on the form that asks the customer how they found out about your company. Just tracking this much may give a large amount of insight into the makeup of your sales funnel and where folks came from, win rates, and all that. But, over time, it also takes a fair amount of work to keep up on those reports.
Now here comes your second option–and that promised web-to-lead form trick. You can also create this form functionality using the power of campaigns. If there are one or more tracking campaigns set up, the W2L form can automatically attribute W2L submissions to the appropriate campaign. Then, campaigns will track leads’ life cycle, conversion, Opportunity, and win/loss to start building the total value of that venue.
And, even better, if you have multiple W2L forms, you can establish one campaign per form, plus a parent campaign to track rollups with all the campaign details! Best of all, this is just standard functionality that comes in Salesforce Professional Edition and above.
So how do you do build these campaigns? Let’s start simple: One form, one campaign.
1) Check your user permissions and validate that you have a marketing user license.
2) Create your “Website Leads” campaign.
3) Copy the ID of the campaign. (The easiest way to do this is to go to the Website Leads Campaign record and copy the ID portion of the URL. Every campaign record has a unique URL. In this example, the portion you’d need to copy is bolded: https://na6.salesforce.com/70130000002uYbA)
4) Create a W2L form or add this code to your current posted W2L form:
<label style=”display:none;” for=”Campaign_ID”>Campaign</label><select style=”display: none” id=”Campaign_ID” name=”Campaign_ID”><option selected=”selected” value=”70130000002uYbA“>Website Leads</option>
5) Test your form. You should now see a lead inserted into Salesforce that has also been added to the campaign.

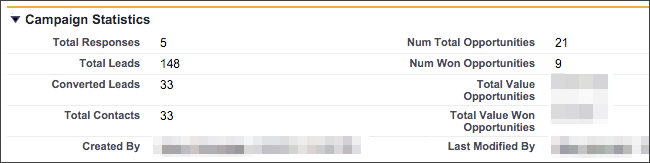
Over time, the campaign will accrue more data and the reporting will look something like this:
If you have multiple forms, you should add one campaign per form, then use the Website Activity as the parent campaign. You’ll get all the rollup data right there in the parent campaign.
If you need details on how to complete any of the steps in this web-to-lead form trick, there’s a lot of documentation in Salesforce’s help and training. And keep perusing our blog to find more insight on getting the most out of web-to-lead forms, including this blog post on doing so in WordPress, and other helpful info for Salesforce professionals. Hopefully this quick web-to-lead form trick will enhance your lead tracking capabilities and help your organization get even more out of its Salesforce investment!